


How To Install A Window Air Conditioner
- Difficulty
- Easy
- Time
- < 1 hour
Window air conditioners are a great way to keep a room cool during the hot summer months, mainly because they are relatively easy to install and inexpensive compared to a central air unit. Install your new window air conditioner in as little as 5 steps!
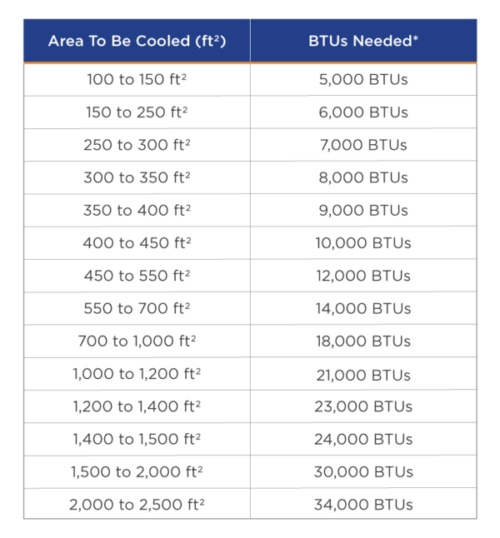
Not all window A/Cs are the same. When purchasing a window air conditioner, you need to determine the size of your space to know how many BTUs you will need. The more BTUs, the more powerful the air conditioner. Check out the graph below to determine how many BTUs you will need for your home.
Before You Begin:
- Evaluate the window you would like to install the air conditioner in. Make sure the window is structurally sound and able to support the weight of the unit.
- Make sure you have an electrical outlet nearby to power the A/C. NEVER use an extension cord. Extension cords cannot handle as much electricity as permanent wiring and could eventually cause a fire. If you are unsure that your outlet is powerful enough to power your air conditioner, please consult an electrician.
Materials
- Window A/C Unit
- Weather Stripping
- L Brackets
- Support Brackets (if desired)
Tools
- Screwdriver/Power Drill
- Screws (Wood or Sheet Metal, depending on window type)
Step 1: Prepare Window
Open the bottom half of the window. Install weather stripping around the window opening. This will provide a weathertight seal to prevent any cool air from sneaking outside. Then, measure & mark the center point of the window.

Step 2: Install A/C Unit & Extend Side Panels
Place the air conditioning unit center in the window. If your air conditioner came with a foam insulating strip, cut it to size and place it on top of the unit. Lower the window sash until it rests on top of the air conditioner, sandwiching the foam strip in between. Slide the accordion side panels all the way to the edges of the window opening and secure the unit with screws.

Step 3: Install Weather Stripping
If there are any gaps, fill them with more weather stripping.
Step 4: Install L Bracket & Support Bracket (if applicable)
Most window air conditioners come with L brackets to hold the window in place. This will stop the window from opening and the air conditioner from falling out.
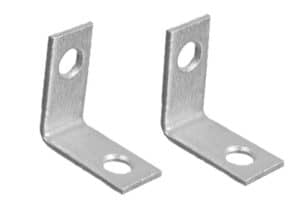
If you have a heavier unit, consider adding an additional support bracket on the outside of the window. This bracket will transfer some of the weight off of the window sash/sill and minimizes the chance of any damage to the window or to the unit. You can purchase these brackets separately at your local hardware and home center.
Step 5: Start Cooling!
Once your window a/c is securely in place, plug it in and set to the desired temperature. Be sure to check & clean the filter about once a month while using, to keep the filter free of any obstructions.
You’re on your way to a cooler summer!
Need A Window Air Conditioner?
Stop by Norfolk Hardware & Home Center today to pick up your window A/C today! Norfolk is Boston’s largest family-owned hardware and home center, with over 40,000 ft2 of retail and showroom space. Norfolk offers everything you need for your home improvement, including window A/Cs, power drills, window support brackets, and more! Plus, you can get free project advice from any one of our Norfolk experts. Stop by any day of the week to check us out or contact us today to see if we have what you need in stock or in our warehouse.Source: DoItBest.com