Paint Projects
How To Paint An Interior Door

Difficulty: Easy
Time: 1 day (including dry time)
Tired of looking at those old, wooden doors? Or maybe your last paint job is starting to peel and could use a refresh? The paint experts at Norfolk Hardware have a few tips on how you can properly paint interior doors to ensure a smooth, professional finish.
Before You Begin:
- (Optional) Remove the door from its hinges using a hammer and nail to release the hinge pins. Place on a flat surface/sawhorse.
- Using painter’s tape, tape around all door hardware or remove using a screwdriver, so that you don’t get paint on them.
Materials
Tools
Sand Interior Door Surface
Lightly sand and scuff the surface of the door. This will remove any glossy finish and allow for better surface adhesion. Wipe clean with a cloth or rag.
Prime The Door
If you are working with a new, unprimed door, or a door that has not previously been painted or painted with an oil-based paint, you will need to prime the interior door first.
If you are working with a pre-primed door, or are using Benjamin Moore ADVANCE, you can skip this step.
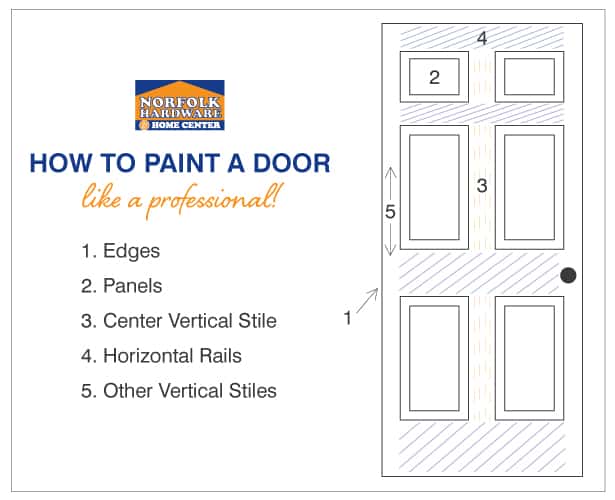
Paint Door Edges
Starting with the edge closest to the hinges, paint the edges of the interior door. If you have elected to leave the door in place while painting, this is especially important as is allows the edges more time to dry and prevent sticking. Start from the top and work your way down.
Paint Inside Panels (if applicable)
If you have a panel door, use an angled paint brush to paint each panel. Paint the inside of the panel first, then move to the edges, starting from the top down. Pay attention to the lower corners, as this is where paint tends to build up. If you see any runs or sags, brush them out while the paint is still wet.
Pro Tip: Using a self-leveling paint, such as Benjamin Moore ADVANCE, will help you avoid brush marks, meaning you can easily paint your door with either a brush or a roller.
Paint The Stiles & Rails
After all the panels have been painted, proceed to paint the center stile, followed by the 3 horizontal rails, and finish with the outermost vertical stiles. Unless you are using a self-leveling paint such as Benjamin Moore ADVANCE, we recommend using a 4” roller for this step.
Pro Tip: While a small roller will help you finish the job more quickly, we recommend using a paintbrush to go over the surface afterwards, a technique called “back-brushing”. This will help you achieve a smoother surface and a nicer looking final product.
Apply Second Coat
Lightly sand the door after the first coat has completely dried. Wipe clean, then apply a second coat of paint, following the order specified above. Allow the door to dry fully, which could take up to 24 hours from the final coat.
Pro Tip: While enamel paint is more durable than regular interior wall paint, which makes it great for heavily used items such as interior doors, the enamel paint takes much longer to fully dry. Make sure you account for this extra dry time when you are planning your project!
Reattach Interior Door & Hardware
If you elected to remove the door from its hinges, reattach the door and all hardware. Remove any painter’s tape. Your work is done!
Quality Paint Products & Expert Painting Advice At Norfolk Hardware
Need paint for your interior doors? Stop by Norfolk Hardware & Home Center, Boston’s best local hardware store and home center since 1934! Norfolk has been recently remodeled and features over 40,000 ft2 of home improvement products, including quality paint materials from all the top brands like Benjamin Moore, Wooster, Kilz, Minwax & more! Stop by our paint pub or contact us today to talk with an expert about your next interior paint project.
Follow us
Latest articles

June 26, 2026

June 26, 2026

June 26, 2026

June 26, 2026
June 26, 2026
